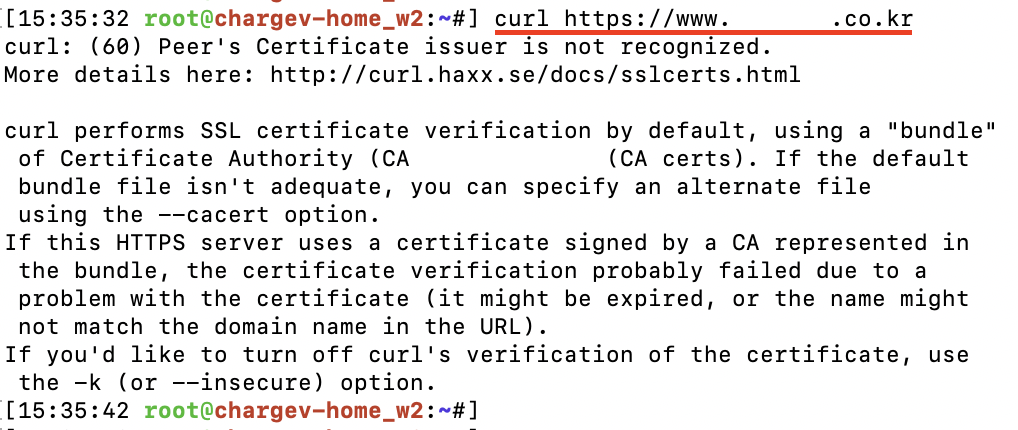
SSL 인증서 중 Comodo 인증서가 sectigo 인증서로 변경되면서 일부 리눅스 시스템 내 Root/chain 인증서가 반영이 안되 어 있어 JAVA SSL HandshakeException 및 Curl 오류가 발생합니다.
"Sectigo(COMODO)의 “AddTrust External Root CA” 만료 이후 HTTPS 접속 오류 현상 관련 안내드립니다." 에서 확인이 가능합니다.
www.certkorea.co.kr/bbs/board.php?bo_table=31&wr_id=30
Sectigo(COMODO)의 “AddTrust External Root CA” 만료 이후 HTTPS 접속 오류 현상 관련 안내드립니다. > 공지�
> 고객지원/이벤트 > 공지사항 공지사항
www.certkorea.co.kr
오류 2 . javax.net.ssl.SSLHandshakeException
javax.net.ssl.SSLHandshakeException: sun.security.validator.ValidatorException: PKIX path building failed: sun.security.provider.certpath.SunCertPathBuilderException: unable to find valid certification path to requested target

이와 같은 경우에는 keytool을 이용해서 인증서를 추가해줘야 합니다.
# keytool 로 인증서 추가하기
# cd ${JAVA_HOME}/jre/lib/security/cacerts
# keytool -list -keystore ${JAVA_HOME}/jre/lib/security/cacerts
키 저장소 비밀번호 입력: changeit
# keytool -import -keystore ${JAVA_HOME}/jre/lib/security/cacerts -file "CA Root 인증서" -alias "인증서별칭"
예)
# cd ${JAVA_HOME}/jre/lib/security/cacerts

# keytool -list -keystore ${JAVA_HOME}/jre/lib/security/cacerts

키 저장소 비밀번호 입력:  changeit
키 저장소 비밀번호 입력:
키 저장소 유형: JKS
키 저장소 제공자: SUN
키 저장소에 104개의 항목이 포함되어 있습니다.

verisignclass2g2ca [jdk], 2016. 8. 26, trustedCertEntry,
인증서 지문(SHA1): B3:EA:C4:47:76:C9:C8:1C:EA:F2:9D:95:B6:CC:A0:08:1B:67:EC:9D
digicertassuredidg3 [jdk], 2016. 8. 26, trustedCertEntry,
인증서 지문(SHA1): F5:17:A2:4F:9A:48:C6:C9:F8:A2:00:26:9F:DC:0F:48:2C:AB:30:89
verisignuniversalrootca [jdk], 2016. 8. 26, trustedCertEntry,
인증서 지문(SHA1): 36:79:CA:35:66:87:72:30:4D:30:A5:FB:87:3B:0F:A7:7B:B7:0D:54
digicerttrustedrootg4 [jdk], 2016. 8. 26, trustedCertEntry,
인증서 지문(SHA1): DD:FB:16:CD:49:31:C9:73:A2:03:7D:3F:C8:3A:4D:7D:77:5D:05:E4
verisignclass1g3ca [jdk], 2016. 8. 26, trustedCertEntry,
인증서 지문(SHA1): 20:42:85:DC:F7:EB:76:41:95:57:8E:13:6B:D4:B7:D1:E9:8E:46:A5
identrustpublicca [jdk], 2016. 8. 26, trustedCertEntry,

# keytool -import -keystore ${JAVA_HOME}/jre/lib/security/cacerts -file "Chain_RootCA_Bundle.crt" -alias "sectigorsatrust"

........
#5: ObjectId: 2.5.29.32 Criticality=false
CertificatePolicies [
  [CertificatePolicyId: [2.5.29.32.0]
[]  ]
  [CertificatePolicyId: [2.23.140.1.2.1]
[]  ]
]

#6: ObjectId: 2.5.29.37 Criticality=false
ExtendedKeyUsages [
  serverAuth
  clientAuth
]

#7: ObjectId: 2.5.29.15 Criticality=true
KeyUsage [
  DigitalSignature
  Key_CertSign
  Crl_Sign
]

#8: ObjectId: 2.5.29.14 Criticality=false
SubjectKeyIdentifier [
KeyIdentifier [
0000: 8D 8C 5E C4 54 AD 8A E1   77 E9 9B F9 9B 05 E1 B8  ..^.T...w.......
0010: 01 8D 61 E1                                        ..a.
]
]

이 인증서를 신뢰합니까? [아니오]:  y
인증서가 키 저장소에 추가되었습니다.
# 추가한 인증서를 삭제하고자 할 경우
# keytool -delete -alias "알리아스인증서명칭" -keystore "cacerts가 있는 경로"예) keytool -delete -alias "usertrustrsacaroot" -keystore ${JAVA_HOME}/jre/lib/security/cacerts
참고 URL
|
blog.naver.com/kgj1/220584997842
|